photoshop software tutorial | Hermagic
When it comes to retouching photos these days, Photoshop is almost the greatest. It has an abundance of useful features for both novice and experienced designers. Are you feeling creative? How about editing a selfie? Add a few crazy effects? Photoshop software tutorial is here to help. This Photoshop software tutorial will walk you through how to use it, highlight its best features, and explain why it’s worth using regardless of your level of experience. Now let’s get started!
Photoshop Software Tutorial: Why Learn Photoshop?
Photoshop is a game-changer for everyone looking to elevate their creative game; it’s not only for experts. It makes no difference if you’re an experienced pro trying to expand your toolkit or a complete novice. This bad boy can do it all, from editing images to producing incredible digital artwork. To be honest, almost everyone in the design, photography, and advertising fields uses this software. The finest aspect? Photoshop can be compared to an imaginative playground. With so many tools at your disposal, you may let your imagination run wild and realize whatever wild notion you have. Why not attempt this Photoshop software tutorial and see where your imagination leads you?
Step-by-Step Photoshop Software Tutorial

Step-by-Step Photoshop Software Tutorial
1. Installing Photoshop
Photoshop must very well be installed before utilizing it. Visit Adobe’s website to select a Photoshop package that best suits your needs; they provide choices for individuals, companies, and students alike. After completing the registration process, launch the Adobe Creative Cloud application on your PC. Search for Photoshop within, select the “Install” option, and presto! You’re well on your road to mastering photo editing. All you need to do is wait while it works, and you’ll be ready to rock in no time.
2. How to Open a New Document
After Photoshop is installed, creating a new document is simple. Tap Photoshop’s icon to launch it. Press Ctrl + N or select File > New to begin a new document. You’ll be able to adjust the backdrop’s color, quality, and size with this dialog box. Even better, you may store these modifications as presets to utilize in other projects.
3. Basic Tools Overview
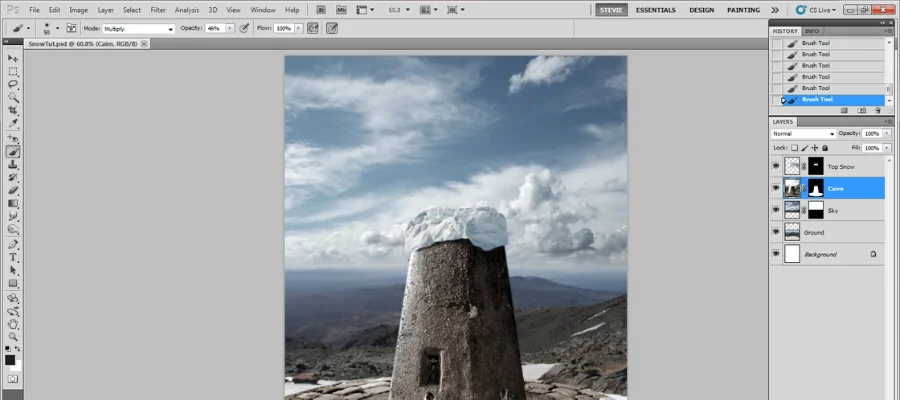
Photoshop very well gives you access to essential instruments that you require for your work. Photoshop’s got some killer tools to play with. Wanna move stuff around? Grab the Move Tool (hit V). Need to select something weird-shaped? Lasso Tool’s got your back (that’s L). Feeling artsy? Paint away with the Brush Tool (B). Messed up? No sweat, just zap it with the Eraser (E). And if you need to trim things down, the Crop Tool’s your bestie (C). The sweet part? You can tweak all these bad boys up in the top bar to make ’em work just how you want.
4. Working with Layers
Photoshop layers are essential because they let you arrange and stack various project components. Once the Layers Panel is open, you can create new layers by selecting Window > Layers or by pressing F7. The keyboard combination Ctrl + Shift + N is another option. Layers give you the ability to make non-destructive changes that is, changes to one element without affecting others which improves workflow structure and flexibility.
5. Using Filters
Photoshop filters can greatly improve or alter photographs. To apply a filter, select an option (such as Blur or Sharpen) from the Filter menu, then adjust the settings in the dialog box that appears. Filters are a useful tool for altering an image’s overall appearance since they may be used to produce a range of artistic effects, such as sharpening details or creating motion.
6. Adding Text
Typography can easily be included in designs with Photoshop’s text tool. To text, click anywhere on the canvas after selecting the Text Tool icon (T) or by pressing the T key on your keyboard. For a more dynamic appearance, you may use the Layer Styles menu to apply effects like shadows and gradients and use the top options bar to change the text, size, and color.
7. Exporting Your Work
The finest quality is ensured when your project is exported correctly after it is finished. To save the layers, save your project first by choosing File > Save As and saving it in PSD format. To finish your work for sharing or printing, select File > Export > Export As, select the file format you want (JPG or PNG), change the quality settings, and click Save.
Benefits of Using Photoshop: Photoshop Software Tutorial

Benefits of Using Photoshop: Photoshop Software Tutorial
Photoshop is popular in many creative industries because of its many user-friendly features.
- Precision Editing: The program ensures that every detail is either captured or updated by the user’s vision, making pixel-perfect editing feasible.
- Creative Freedom: To very well improve one’s creativity, Photoshop gives an endless cluster of brushes, effects, and tools. Whether you’re making a sophisticated photo collage or a basic touch-up, the possibilities are endless.
- Professional Findings: Photoshop is well known for creating high-quality pictures suitable for both printing and the internet. The software produces very high-quality banners for websites as well as billboards.
- Customizability: The toolkit and interface of Photoshop are quite adaptable. Users can build custom workspaces that are suited to their requirements, which streamlines their workflow.
- Adobe’s Unmatched Support: To assist clients get the most out of Photoshop’s highlights, Adobe gives the greatest support available on the market, including standard updates, customer service, and in-depth online lessons.
Tips and Tricks: Photoshop software tutorial
- Learn Keyboard Shortcuts: Finding shortcuts can help you work much more quickly. Use Ctrl + T, for instance, to swiftly resize items, or B to use the brush tool.
- Use Actions: You can automate repetitive operations in Photoshop by using the Actions tool. Time can be saved by recording a sequence of actions and playing them back on other tasks.
- Work Non-Destructively: When editing, always make use of layers, masks, and adjustment layers. This lets you make adjustments or undo them without impacting the original picture.
- Examine Brushes: The brush tool in Photoshop is not simply for painting. With custom brushes, you may make digital artwork, textures, and patterns.
- Advantage of Combining Modes: Play around with different mixing modes to get interesting results, especially when adjusting textures, lighting, and shadows.
Conclusion
With so many Photoshop software tutorials, tools, and functions for creating, editing, and refining photos, Adobe Photoshop very well is a strong and adaptable software. Photoshop has capabilities that are suitable for both novices and experts, ranging from simple tasks like adding text and filtering to more complex ones like making new documents and modifying layers. Users may bring their creative ideas to life with its intuitive interface and a multitude of customizing options. With its excellent support and guidance via classes and resources, Adobe is the best platform for learning graphic design and picture editing. For more information on Photoshop software tutorial, visit Hermagic.
FAQs


